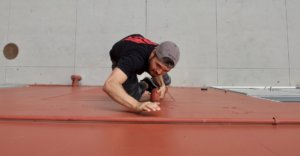
Intro
If you want to clean up your drop/landing skills without taking too much extra impact, consider the low-impact and highly accessible nature of fake drops.
Surely others have trained fake drops before but I don’t recall seeing this series of drills anywhere else in my 18 years of parkour and 20 years of strength & conditioning—so please correct me if I’m wrong! Sometimes the best sport-specific movements are so simple and easy to overlook.
Fake drops are a useful way to maintain and sharpen your drop/landing skills, without the need to do big jumps or drops. In the right context and for the right athlete, they’re also solid additions to warm-ups, skill work, and workouts. Or if you’re coming back from an injury and need to ease back into impact, fake drops are great for return-to-play protocols.
Why?
- builds eccentric leg strength, mobility, & stability (specifically around the toes, feet, ankles, & knees)
- improves dropping, landing, and rebounding based skills (less balance corrections = less force leakage = higher potential for speed & power)
- mimics landings but with less impact (allows you to train & build more skill with a relatively lower risk of impact-related injury)

How?
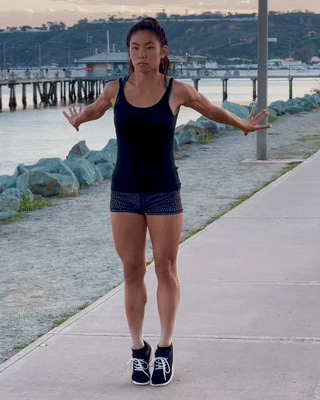
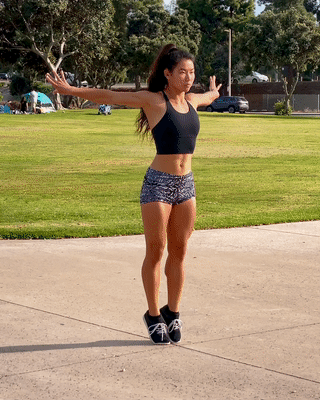
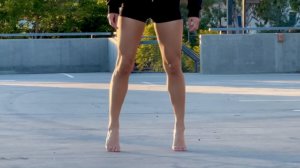
- start on flat ground and if needed, progress to a low obstacle with an edge to hang your heels over
- stand up tall and move your arms into place while rising onto your toes
- create full-body tension in the top and final positions of every rep
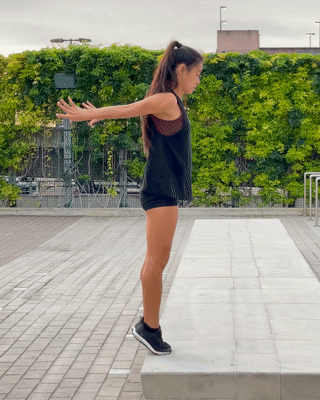
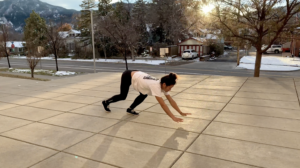
- quickly drop toward the ground, getting just a split-second of air time to simulate a landing impact
- upon landing, freeze and stabilize as quickly as possible (the closer your time to stabilization is to zero, the better)
→ For a skill-based approach to learning and teaching parkour, check out #1 online training program: Parkour 100 Series
→ To get our most comprehensive parkour strength training resource, consider purchasing our digital training manual: Parkour Strength Online
Surfaces
The most common place to train fake drops is on flat ground but if you’re looking for more challenge, you can use the edge of a wall to simulate a precision landing. Some advanced athletes are also able to consistently stick fake drops on rails.
Flat ground
Fake drop training begins at ground level because it’s inherently safer and easier to do. You don’t need to worry about landing precisely or falling of an obstacle. Flat ground allows for maximum speed and attention to technical detail.
Fake drop progressions on flat ground:
- Fake drop (arms down) → hard landing (flat ground)
- Fake drop (arms down) → mid landing (flat ground)
- Fake drop (arms down) → soft landing (flat ground)
- Fake drop (arms down) → gallop landing (flat ground)
- Fake drop (arms down) → shrimp landing (flat ground)
- Fake drop (arms down) → sprinter landing (flat ground)
- Fake drop (arms back) → hard landing (flat ground)
- Fake drop (arms back) → mid landing (flat ground)
- Fake drop (arms back) → soft landing (flat ground)
- Fake drop (arms back) → gallop landing (flat ground)
- Fake drop (arms back) → shrimp landing (flat ground)
- Fake drop (arms back) → sprinter landing (flat ground)
- Fake drop (arms up) → hard landing (flat ground)
- Fake drop (arms up) → mid landing (flat ground)
- Fake drop (arms up) → soft landing (flat ground)
- Fake drop (arms up) → gallop landing (flat ground)
- Fake drop (arms up) → shrimp landing (flat ground)
- Fake drop (arms up) → sprinter landing (flat ground)
Wall
When you can consistently stick and quickly stabilize the majority of your fake drops, it’s time to make things harder by doing them on the edge of a low wall or similar obstacle. Fake drops on a wall simulate a precision landing with floating heels. This style of fake drop is naturally harder and less stable, so you must focus even more on accuracy, balance, and ankle stiffness.
Fake drop progressions on a wall:
- Fake drop (arms down) → hard precision landing (wall)
- Fake drop (arms down) → mid precision landing (wall)
- Fake drop (arms down) → shrimp precision landing (wall)
- Fake drop (arms down) → sprinter precision landing (wall)
- Fake drop (arms back) → hard precision landing (wall)
- Fake drop (arms back) → mid precision landing (wall)
- Fake drop (arms back) → shrimp precision landing (wall)
- Fake drop (arms back) → sprinter precision landing (wall)
- Fake drop (arms up) → hard precision landing (wall)
- Fake drop (arms up) → mid precision landing (wall)
- Fake drop (arms up) → shrimp precision landing (wall)
- Fake drop (arms up) → sprinter precision landing (wall)
Rail
We haven’t filmed any fake drops on rails yet, but we occasionally use them in various programs at Apex. For high-performing beginners, a lite version of a fake drops on ground rails doubles as a good intro to precision landings on rails. Fake drops on rails are also a good challenge for intermediate/advanced athletes who are working on the technical details of their rail landings at height and/or how to fall in any direction.
Due to the precise forefoot landing with your heels floating off the edge, fake drops on walls and rails require more skill and stability than on flat ground. There may even be a mental component to your fake drop training if there’s a drop in any direction from the rail. Remember that training fake drops on rails is definitely not necessary, and maybe not even worth the risk, for most people. Flat ground and low walls will get you most of your fake drop gains.
Arm movements
The purpose of the top position in a fake drop is to mimic common shapes seen in midair, right before a landing impact. While each fake drop finishes with the arms in front of the body, the 3 main arm positions we use in fake drops are:
- arms down
- arms back
- arms up
Arms down
Arms down is the easiest, simplest of the 3 different arm movements. It requires the least amount of movement which is good when you’re also thinking of many other technical details during each rep. Arms down fake drops simulate drops and jumps in which you don’t have time to load them farther back. Arms down can also be a practical position to be in when reaching for a max-effort jump.
Fake drop progressions with arms down:
- Fake drop (arms down) → hard landing (flat ground)
- Fake drop (arms down) → hard precision landing (wall)
- Fake drop (arms down) → mid landing (flat ground)
- Fake drop (arms down) → mid precision landing (wall)
- Fake drop (arms down) → soft landing (flat ground)
- Fake drop (arms down) → gallop landing (flat ground)
- Fake drop (arms down) → shrimp landing (flat ground)
- Fake drop (arms down) → shrimp precision landing (wall)
- Fake drop (arms down) → sprinter landing (flat ground)
- Fake drop (arms down) → sprinter precision landing (wall)
Arms back
Arms back is the most common arm movement we use in fake drops because it’s the most practical midair arm position to hit during big drops/jumps, right before landing. Arms full loaded back give you the most margin for error when landing precisely. Arm back also gives you the most power to spring into the next movement after impact.
Fake drop progressions with arms back:
- Fake drop (arms back) → hard landing (flat ground)
- Fake drop (arms back) → hard precision landing (wall)
- Fake drop (arms back) → mid landing (flat ground)
- Fake drop (arms back) → mid precision landing (wall)
- Fake drop (arms back) → soft landing (flat ground)
- Fake drop (arms back) → gallop landing (flat ground)
- Fake drop (arms back) → shrimp landing (flat ground)
- Fake drop (arms back) → shrimp precision landing (wall)
- Fake drop (arms back) → sprinter landing (flat ground)
- Fake drop (arms back) → sprinter precision landing (wall)
Arms up
Arms up is the least common fake drop that we use because it’s the rarest position to hit in midair during big drops, jumps, or flips. However, there are a few techniques that include arms up positions including cat drops and laches. By training your arms to start high, circle/load back, and swing through to front, you’ll maximize the efficiency and aesthetics in even the hardest, biggest, and most complex movements.
Fake drop progressions with arms up:
- Fake drop (arms up) → hard landing (flat ground)
- Fake drop (arms up) → hard precision landing (wall)
- Fake drop (arms up) → mid landing (flat ground)
- Fake drop (arms up) → mid precision landing (wall)
- Fake drop (arms up) → soft landing (flat ground)
- Fake drop (arms up) → gallop landing (flat ground)
- Fake drop (arms up) → shrimp landing (flat ground)
- Fake drop (arms up) → shrimp precision landing (wall)
- Fake drop (arms up) → sprinter landing (flat ground)
- Fake drop (arms up) → sprinter precision landing (wall)
Landing styles
Now, I know what you’re most definitely *not* thinking right now. “But I wanna jump Manpower, and do flips, and impress my mom. What are fake drops gonna do for me?”
Anyone can throw a big jump or flip, but it’s the landing that shows true skill. Here are 6 of our favorite landing styles to add into your fake drop training:
- hard
- mid
- soft
- gallop (both sides)
- shrimp (both sides)
- sprinter (both sides)
Hard landing
Compared to a mid or soft landing where squat ROM is deeper, a hard landing should stay stiffer & taller. Various drop to hard landing drills build eccentric strength & power for better rebounding movements. Hard landings also develop faster movement transitions through improved deceleration + change of direction.
In time-sensitive A-to-B challenges with a small drop, hard landings are typically the faster option vs. mid or soft landings. On the other hand, hard landings tend to be more impactful and potentially less sustainable over time. Consider your strengths, weaknesses, and training intentions when choosing which landing to use (mid or soft for low(er)-impact/longevity, hard for speed/performance, etc).
Fake drop progressions with hard landings:
- Fake drop (arms down) → hard landing (flat ground)
- Fake drop (arms down) → hard precision landing (wall)
- Fake drop (arms back) → hard landing (flat ground)
- Fake drop (arms back) → hard precision landing (wall)
- Fake drop (arms up) → hard landing (flat ground)
- Fake drop (arms up) → hard precision landing (wall)
Mid landing
Many of the same cues and tips for hard and soft landings also apply to the mid landing. With the name mid landing, we mean the landing ROM used is in the middle of a quarter vs. full squat (aka hard vs. soft landing). This ends up right around a 90-degree or parallel squat, depending on the person.
While there’s typically no intentional application of a mid landing, it’s a reasonable landing ROM you could find yourself in on some of the jumps or drops that are too big for a hard landing. It’s better to get some practice in that mid ROM before you ever need it!
Fake drop progressions with mid landings:
- Fake drop (arms down) → mid landing (flat ground)
- Fake drop (arms down) → mid precision landing (wall)
- Fake drop (arms back) → mid landing (flat ground)
- Fake drop (arms back) → mid precision landing (wall)
- Fake drop (arms up) → mid landing (flat ground)
- Fake drop (arms up) → mid precision landing (wall)
Soft landing
Unlike mid or hard landings that stay stiffer/taller, soft landings use deeper squat ROM & sometimes even palms-to-ground for balance or protection. Drop to soft landing builds strength and control for full ROM landings, as well as offering a lower-impact way to train.
In scenarios where you want to land quietly or gently, soft landings are typically a better option than mid or hard landings. On the other hand, soft landings tend to be slower/weaker during time-sensitive challenges & speed/power-based movements. Consider your strengths, weaknesses, and training intentions when choosing which landing to use (e.g. for low(er)-impact/longevity, for speed/performance, etc).
Fake drop progressions with soft landings:
Gallop landing
Gallop landings are useful if you’re taking a bigger drop where you need to use a soft landing while maintaining high speed and momentum into another move. Rather than absorbing all the way to a soft landing, the gallop landing spreads impact across more limbs, time, and distance—making it easier to keep going into the next movement. Gallop landings also help you to change directions or quickly duck under a low obstacle.
Fake drop progressions with gallop landings:
Shrimp landing
Shrimp landings are an effective way to improve your time to stabilization. Faster times to stabilization also suggest better positions and mechanics for stronger, more controlled footwork during strides, tacs, etc. Shrimp landings are also an important position leading up to the sprinter landing.
Fake drop progressions with shrimp landings:
- Fake drop (arms down) → shrimp landing (flat ground)
- Fake drop (arms down) → shrimp precision landing (wall)
- Fake drop (arms back) → shrimp landing (flat ground)
- Fake drop (arms back) → shrimp precision landing (wall)
- Fake drop (arms up) → shrimp landing (flat ground)
- Fake drop (arms up) → shrimp precision landing (wall)
Sprinter landing
Practicing various movements to sprinter landing builds speed & coordination for complex jumping/landing/ascent combos. Specifically, it mimics the mechanics of connecting a single-leg landing into a sprint/stride/jump or a top-out/climb-up to sprint/stride/step-up.
By moving quickly into sprinter landing, you learn to optimize key posture/positioning elements like knee drive, ankle dorsiflexion, & arm/leg reciprocation. By stabilizing as fast as possible at the top of each rep, you also learn rhythm & relaxation for max power & efficiency.
To get better at sprinter landings, gradually land higher, knee drive quicker, & freeze faster. If you’re struggling to control the landing or coordinate your limbs, revisit sprint mechanics drills like A walk/skip/run.
Fake drop progressions with sprinter landings:
- Fake drop (arms down) → sprinter landing (flat ground)
- Fake drop (arms down) → sprinter precision landing (wall)
- Fake drop (arms back) → sprinter landing (flat ground)
- Fake drop (arms back) → sprinter precision landing (wall)
- Fake drop (arms up) → sprinter landing (flat ground)
- Fake drop (arms up) → sprinter precision landing (wall)
Ryan Ford is founder of Apex School of Movement, director of Parkour Strength Online, & author of Parkour Strength Training.
Related posts

Too old, too fat, too weak for parkour? Start with these 5 basic movements
“When did you start parkour?” “When did you stop?” … 🤔 Everyone did at least a bit of parkour as a kid. At one point
Intro to climb-up strength & skill training
When was the last time you stumbled across a set of rings or monkey bars outside the gym? Maybe at a park or playground? What
Six foot drills for ankle mobility, strength, & stability
When I first stumbled upon The Foot Drills by Russ Ebbets, DC, I was impressed by the elegance of the idea. Six foot drills can
Build your climb-up from the ground up
If your climb-up needs work, consider drilling the progressions in this blog post. For most of these movements, remember to put extra emphasis on training